Command Line Interface: The Shell
Last updated on 2025-08-27 | Edit this page
Estimated time: 60 minutes
Overview
Questions
- “How do I use the Linux terminal?”
Objectives
- “Learn the most basic UNIX/Linux commands”
- “Learn how to navigate the filesystem”
- “Creating, moving, and removing files/directories”
Command Line Interface
At a high level, an HPC cluster is just a bunch of computers that appear to the user like a single entity to execute calculations. A machine where several users can work simultaneously. The users expect to run a variety of scientific codes. To do that, users store the data needed as input, and at the end of the calculations, the data generated as output is also stored or used to create plots and tables via postprocessing tools and scripts. In HPC, compute nodes can communicate with each other very efficiently. For some calculations that are too demanding for a single computer, several computers could work together on a single calculation, eventually sharing information.
Our daily interactions with regular computers like desktop computers and laptops occur via various devices, such as the keyboard and mouse, touch screen interfaces, or the microphone when using speech recognition systems. Today, we are very used to interact with computers graphically, tablets, and phones, the GUI is widely used to interact with them. Everything takes place with graphics. You click on icons, touch buttons, or drag and resize photos with your fingers.
However, in HPC, we need an efficient and still very light way of communicating with the computer that acts as the front door of the cluster, the login node. We use the shell instead of a graphical user interface (GUI) for interacting with the HPC cluster.
In the GUI, we give instructions using a keyboard, mouse, or touchscreen. This way of interacting with a computer is intuitive and very easy to learn but scales very poorly for large streams of instructions, even if they are similar or identical. All that is very convenient but that is now how we use HPC clusters.
Later on in this lesson, we will show how to use Open On-demand, a web service that allows you to run interactive executions on the cluster using a web interface and your browser. For most of this lesson, we will use the Command Line Interface, and you need to familiarize yourself with it.
For example, you need to copy the third line of each of a thousand text files stored in a thousand different folders and paste it into a single file line by line. Using the traditional GUI approach of mouse clicks will take several hours to do this.
This is where we take advantage of the shell - a command-line interface (CLI) to make such repetitive tasks with less effort. It can take a single instruction and repeat it as is or with some modification as many times as we want. The task in the example above can be accomplished in a single line of a few instructions.
The heart of a command-line interface is a read-evaluate-print loop (REPL) so, called because when you type a command and press Return (also known as Enter), the shell reads your command, evaluates (or “executes”) it, prints the output of your command, loops back and waits for you to enter another command. The REPL is essential in how we interact with HPC clusters.
Even if you are using a GUI frontend such as Jupyter or RStudio, REPL is there for us to instruct computers on what to do next.
The Shell
The Shell is a program that runs other programs rather than doing calculations itself. Those programs can be as complicated as climate modeling software and as simple as a program that creates a new directory. The simple programs which are used to perform stand-alone tasks are usually referred to as commands. The most popular Unix shell is Bash (the Bourne Again SHell — so-called because it’s derived from a shell written by Stephen Bourne). Bash is the default shell on most modern implementations of Unix and in most packages that provide Unix-like tools for Windows.
When the shell is first opened, you are presented with a prompt, indicating that the shell is waiting for input.
~$The shell we will use for this lessos will be shown as
~$. Notice that the prompt may be customized by the user to
have more information such as date, user, host, current working
directory and many other pieces of information. For example you can see
my prompt as 22:16:00-gufranco@trcis001:~$.
The prompt
When typing commands from these lessons or other sources, do not type the prompt, only the commands that follow it.
~$ ls -alWhy use the Command Line Interface?
Before the usage of Command Line Interface (CLI), computer interaction took place with perforated cards or even switching cables on a big console. Despite all the years of new technology and innovation, the mouse, touchscreens and voice recognition; the CLI remains one of the most powerful and flexible tools for interacting with computers.
Because it is radically different from a GUI, the CLI can take some effort and time to learn. A GUI presents you with choices to click on. With a CLI, the choices are combinations of commands and parameters, more akin to words in a language than buttons on a screen. Because the options are not presented to you, some vocabulary is necessary in this new “language.” But a small number of commands gets you a long way, and we’ll cover those essential commands below.
Flexibility and automation
The grammar of a shell allows you to combine existing tools into powerful pipelines and handle large volumes of data automatically. Sequences of commands can be written into a script, improving the reproducibility of workflows and allowing you to repeat them easily.
In addition, the command line is often the easiest way to interact with remote machines and supercomputers. Familiarity with the shell is essential to run a variety of specialized tools and resources including high-performance computing systems. As clusters and cloud computing systems become more popular for scientific data crunching, being able to interact with the shell is becoming a necessary skill. We can build on the command-line skills covered here to tackle a wide range of scientific questions and computational challenges.
Starting with the shell
If you still need to download the hands-on materials. This is the perfect opportunity to do so
~$ git clone https://github.com/WVUHPC/workshops_hands-on.gitLet’s look at what is inside the workshops_hands-on
folder and explore it further. First, instead of clicking on the folder
name to open it and look at its contents, we have to change the folder
we are in. When working with any programming tools, folders are
called directories. We will be using folder and directory
interchangeably moving forward.
To look inside the workshops_hands-on directory, we need
to change which directory we are in. To do this, we can use the
cd command, which stands for “change directory”.
~$ cd workshops_hands-onDid you notice a change in your command prompt? The “~” symbol from
before should have been replaced by the string
~/workshops_hands-on$. This means our cd
command ran successfully, and we are now in the new directory.
Let’s see what is in here by listing the contents:
You should see:
Introduction_HPC LICENSE Parallel_Computing README.md Scientific_Programming SparkArguments
Six items are listed when you run ls, but what types of
files are they, or are they directories or files?
To get more information, we can modify the default behavior of
ls with one or more “arguments”.
~$ ls -F

Introduction_HPC/  LICENSE  Parallel_Computing/  README.md  Scientific_Programming/  Spark/
Anything with a “/” after its name is a directory. Things with an asterisk “*” after them are programs. If there are no “decorations” after the name, it’s a regular text file.
You can also use the argument -l to show the directory
contents in a long-listing format that provides a lot more
information:
~$ ls -ltotal 64
drwxr-xr-x 13 gufranco its-rc-thorny 4096 Jul 23 22:50 Introduction_HPC
-rw-r--r-- 1 gufranco its-rc-thorny 35149 Jul 23 22:50 LICENSE
drwxr-xr-x 6 gufranco its-rc-thorny 4096 Jul 23 22:50 Parallel_Computing
-rw-r--r-- 1 gufranco its-rc-thorny 715 Jul 23 22:50 README.md
drwxr-xr-x 9 gufranco its-rc-thorny 4096 Jul 23 22:50 Scientific_Programming
drwxr-xr-x 2 gufranco its-rc-thorny 4096 Jul 23 22:50 SparkEach line of output represents a file or a directory. The directory
lines start with d. If you want to combine the two
arguments -l and -F, you can do so by saying
the following:
~$ ls -lFDo you see the modification in the output?
Details
Notice that the listed directories now have / at the end
of their names.
Tip - All commands are essentially programs that are able to perform specific, commonly-used tasks.
Most commands will take additional arguments controlling their
behavior, and some will take a file or directory name as input. How do
we know what the available arguments that go with a particular command
are? Most commonly used shell commands have a manual available in the
shell. You can access the manual using the man command.
Let’s try this command with ls:
This will open the manual page for ls, and you will lose
the command prompt. It will bring you to a so-called “buffer” page, a
page you can navigate with your mouse, or if you want to use your
keyboard, we have listed some basic keystrokes: * ‘spacebar’ to go
forward * ‘b’ to go backward * Up or down arrows to go forward or
backward, respectively
To get out of the man “buffer” page and to be
able to type commands again on the command prompt, press the
q key!
Exercise
- Open up the manual page for the
findcommand. Skim through some of the information.- Would you be able to learn this much information about many commands by heart?
- Do you think this format of information display is useful for you?
- Quit the
manbuffer (using the keyq) and return to your command prompt.
Tip - Shell commands can get extremely complicated. No one can learn all of these arguments, of course. So you will likely refer to the manual page frequently.
Tip - If the manual page within the Terminal is hard to read and traverse, the manual exists online, too. Use your web-searching powers to get it! In addition to the arguments, you can also find good examples online; Google is your friend.
~$ man findThe Unix directory file structure (a.k.a. where am I?)
Let’s practice moving around a bit. Let’s go into the
Introduction_HPC directory and see what is there.
Great, we have traversed some sub-directories, but where are we in
the context of our pre-designated “home” directory containing the
workshops_hands-on directory?!
The “root” directory!
Like on any computer you have used before, the file structure within a Unix/Linux system is hierarchical, like an upside-down tree with the “/” directory, called “root” as the starting point of this tree-like structure:
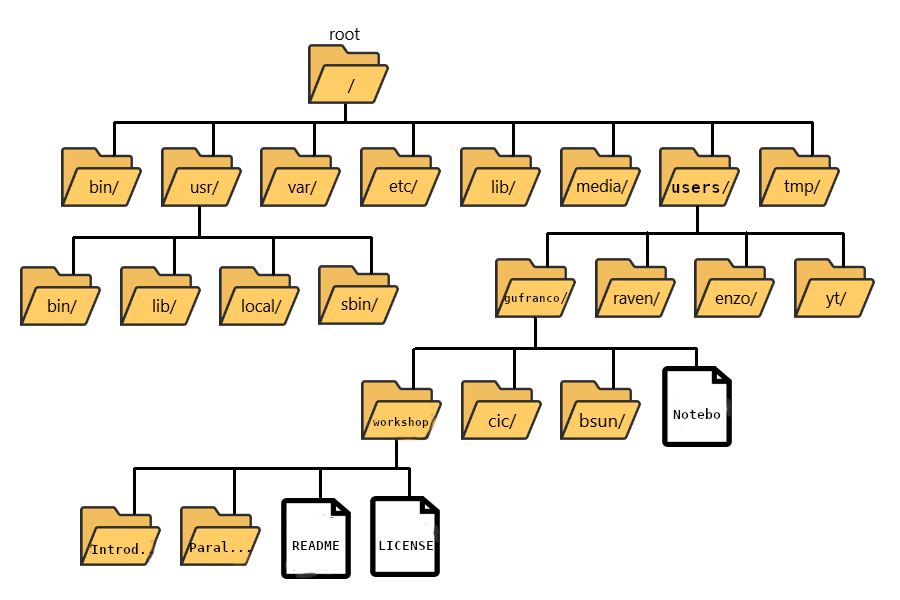
Tip - Yes, the root folder’s actual name is just
/(a forward slash).
That / or root is the ‘top’ level.
When you log in to a remote computer, you land on one of the branches
of that tree, i.e., your pre-designated “home” directory that usually
has your login name as its name (e.g. /users/gufranco).
Tip - On macOS, which is a UNIX-based OS, the root level is also “/”.
Tip - On a Windows OS, it is drive-specific; “C:" is considered the default root, but it changes to”D:", if you are on another drive.
Paths
Now let’s learn more about the “addresses” of directories, called “path”, and move around the file system.
Let’s check to see what directory we are in. The command prompt tells
us which directory we are in, but it doesn’t give information about
where the Introduction_HPC directory is with respect to our
“home” directory or the / directory.
The command to check our current location is pwd. This
command does not take any arguments, and it returns the path or address
of your present working
directory (the folder you are in currently).
~$ pwdIn the output here, each folder is separated from its “parent” or
“child” folder by a “/”, and the output starts with the root
/ directory. So, you are now able to determine the location
of Introduction_HPC directory relative to the root
directory!
But which is your pre-designated home folder? No matter where you
have navigated to in the file system, just typing in cd
will bring you to your home directory.
~$ cdWhat is your present working directory now?
~$ pwdThis should now display a shorter string of directories starting with root. This is the full address to your home directory, also referred to as “full path”. The “full” here refers to the fact that the path starts with the root, which means you know which branch of the tree you are on in reference to the root.
Challenge
Take a look at your command prompt now. Does it show you the name of this directory (your username?)?
No, it doesn’t. Instead of the directory name, it shows you a
~.
Challenge
Why is not showing the path to my home folder?
This is because ~ is a synonimous to the full path to
the home directory for the user.*
Challenge
Can I just type ~ instead of
/users/username?
Yes, it is possible to use ~ as replacement of the full
path to your home folder. You can for example execute:
~$ ls ~~$ cd ~But in this case, it is simpler to just execute
~$ cdTo go to your home folder. There is also a variable called
$HOME that contains the path to your home folder.
Using paths with commands
You can do much more with the idea of stringing together
parent/child directories. Let’s say we want to look at the
contents of the Introduction_HPC folder but do it from our
current directory (the home directory. We can use the list command and
follow it up with the path to the folder we want to list!
~$ cd

~$ ls -l ~/workshops_hands-on/Introduction_HPC
Now, what if we wanted to change directories from ~
(home) to Introduction_HPC in a single step?
Done! You have moved two levels of directories in one command.
What if we want to move back up and out of the
Introduction_HPC directory? Can we just type
cd workshops_hands-on? Try it and see what happens.
Unfortunately, that won’t work because when you say
cd workshops_hands-on, shell is looking for a folder called
workshops_hands-on within your current directory,
i.e. Introduction_HPC.
Can you think of an alternative?
You can use the full path to workshops_hands-on!
Tip What if we want to navigate to the previous folder but can’t quite remember the full or relative path, or want to get there quickly without typing a lot? In this case, we can use
cd -. When-is used in this context it is referring to a special variable called$OLDPWDthat is stored without our having to assign it anything. We’ll learn more about variables in a future lesson, but for now you can see how this command works. Try typing:This command will move you to the last folder you were in before your current location, then display where you now are! If you followed the steps up until this point it will have moved you to
~/workshops_hands-on/Introduction_HPC. You can use this command again to get back to where you were before (~/workshops_hands-on) to move on to the Exercises.
Exercises
- First, move to your home directory.
- Then, list the contents of the
Parallel_Computingdirectory within theworkshops_hands-ondirectory.
Tab completion
Typing out full directory names can be time-consuming and
error-prone. One way to avoid that is to use tab
completion. The tab key is located on the left
side of your keyboard, right above the caps lock key. When
you start typing out the first few characters of a directory name, then
hit the tab key, Shell will try to fill in the rest of the
directory name.
For example, first type cd to get back to your home
directly, then type cd uni, followed by pressing the
tab key:
The shell will fill in the rest of the directory name for
workshops_hands-on.
Now, let’s go into Introduction_HPC, then type
ls 1, followed by pressing the tab key
once:
Nothing happens!!
The reason is that there are multiple files in the
Introduction_HPC directory that start with 1.
As a result, shell needs to know which one to fill in. When you hit
tab a second time again, the shell will then list all the
possible choices.
Now you can select the one you are interested in listed, enter the number, and hit the tab again to fill in the complete name of the file.
NOTE: Tab completion can also fill in the names of commands. For example, enter
e<tab><tab>. You will see the name of every command that starts with ane. One of those isecho. If you enterech<tab>, you will see that tab completion works.
Tab completion is your friend! It helps prevent spelling mistakes and speeds up the process of typing in the full command. We encourage you to use this when working on the command line.
Relative paths
We have talked about full paths so far, but there is
a way to specify paths to folders and files without having to worry
about the root directory. You used this before when we were learning
about the cd command.
Let’s change directories back to our home directory and once more
change directories from ~ (home) to
Introduction_HPC in a single step. (Feel free to use
your tab-completion to complete your path!)
This time we are not using the ~/ before
workshops_hands-on. In this case, we are using a relative
path, relative to our current location - wherein we know that
workshops_hands-on is a child folder in our home folder,
and the Introduction_HPC folder is within
workshops_hands-on.
Previously, we had used the following:
There is also a handy shortcut for the relative path to a parent
directory, two periods ... Let’s say we wanted to move from
the Introduction_HPC folder to its parent folder.
You should now be in the workshops_hands-on directory
(check the command prompt or run pwd).
You will learn more about the
..shortcut later. Can you think of an example when this shortcut to the parent directory won’t work?Answer
When you are at the root directory, since there is no parent to the root directory!
When using relative paths, you might need to check what the branches
are downstream of the folder you are in. There is a really handy command
(tree) that can help you see the structure of any
directory.
If you are aware of the directory structure, you can string together a list of directories as long as you like using either relative or full paths.
Synopsis of Full versus Relative paths
A full path always starts with a /, a relative
path does not.
A relative path is like getting directions from someone on the street. They tell you to “go right at the Stop sign, and then turn left on Main Street”. That works great if you’re standing there together, but not so well if you’re trying to tell someone how to get there from another country. A full path is like GPS coordinates. It tells you exactly where something is, no matter where you are right now.
You can usually use either a full path or a relative path depending on what is most convenient. If we are in the home directory, it is more convenient to just enter the relative path since it involves less typing.
Over time, it will become easier for you to keep a mental note of the structure of the directories that you are using and how to quickly navigate among them.
Copying, creating, moving, and removing data
Now we can move around within the directory structure using the command line. But what if we want to do things like copy files or move them from one directory to another, rename them?
Let’s move into the Introduction_HPC directory, which
contains some more folders and files:
cp: Copying files and folders
Let’s use the copy (cp) command to make a copy of one of
the files in this folder, Mov10_oe_1.subset.fq, and call
the copied file Mov10_oe_1.subset-copy.fq. The copy command
has the following syntax:
cp path/to/item-being-copied path/to/new-copied-item
In this case the files are in our current directory, so we just have to specify the name of the file being copied, followed by whatever we want to call the newly copied file.
The copy command can also be used for copying over whole directories,
but the -r argument has to be added after the
cp command. The -r stands for “recursively
copy everything from the directory and its sub-directories”.
We used it earlier when we copied over the
workshops_hands-on directory to our home directories
#copying-example-data-folder).
mkdir: Creating folders
Next, let’s create a directory called ABINIT and we can
move the copy of the input files into that directory.
The mkdir command is used to make a directory, syntax:
mkdir name-of-folder-to-be-created.
Tip - File/directory/program names with spaces in them do not work well in Unix. Use characters like hyphens or underscores instead. Using underscores instead of spaces is called “snake_case”. Alternatively, some people choose to skip spaces and rather just capitalize the first letter of each new word (i.e. MyNewFile). This alternative technique is called “CamelCase”.
mv: Moving files and folders
We can now move our copied input files into the new directory. We can
move files around using the move command, mv, syntax:
mv path/to/item-being-moved path/to/destination
In this case, we can use relative paths and just type the name of the file and folder.
Let’s check if the move command worked like we wanted:
Let us run abinit, this is a quick execution, and you have not yet learned how to submit jobs. So, for this exceptional time, we will execute this on the login node
mv: Renaming files and folders
The mv command has a second functionality, it is what
you would use to rename files, too. The syntax is identical to when we
used mv for moving, but this time instead of giving a
directory as its destination, we just give a new name as its
destination.
The files t17.out can be renamed, the ABINIT could run again with some change in the input. We want to rename that file:
Tip - You can use
mvto move a file and rename it simultaneously!
Important notes about mv: * When using
mv, the shell will not ask if you are sure
that you want to “replace existing file” or similar unless you use the
-i option. * Once replaced, it is not possible to get the replaced file
back!
Removing
We did not need to create a backup of our output as we noticed this
file is no longer needed; in the interest of saving space on the
cluster, we want to delete the contents of the
t17.backup.out.
Important notes about rm * rm permanently
removes/deletes the file/folder. * There is no concept of “Trash” or
“Recycle Bin” on the command line. When you use rm to
remove/delete, they’re really gone. * Be careful with this
command! * You can use the -i argument if you want
it to ask before removing rm -i file-name.
Let’s delete the ABINIT folder too. First, we’ll have to navigate our way to the parent directory (we can’t delete the folder we are currently in/using).
Did that work? Did you get an error?
Explanation
By default, rm, will NOT delete directories, but you use
the -r flag if you are sure that you want to delete the
directories and everything within them. To be safe, let’s use it with
the -i flag.
-
-r: recursive, commonly used as an option when working with directories, e.g. withcp. -
-i: prompt before every removal.
Exercise
- Create a new folder in
workshops_hands-oncalledabinit_test - Copy over the abinit inputs from
2._Command_Line_Interfaceto the~/workshops_hands-on/Introduction_HPC/2._Command_Line_Interface/abinit_testfolder - Rename the
abinit_testfolder and call itexercise1
Exiting from the cluster
To close the interactive session on the cluster and disconnect from
the cluster, the command is exit. So, you are going to have
to run the exit command twice.
00:11:05-gufranco@trcis001:~$ exit
logout
Connection to trcis001 closed.
guilleaf@MacBook-Pro-15in-2015 ~ %
10 Unix/Linux commands to learn and use
The echo and cat commands
The echo command is very basic; it returns what you give
back to the terminal, kinda like an echo. Execute the command below.
~$ echo "I am learning UNIX Commands"OUTPUT
I am learning UNIX CommandsThis may not seem that useful right now. However, echo
will also print the contents of a variable to the terminal. There are
some default variables set for each user on the HPCs: $HOME
is the pathway to the user’s “home” directory, and $SCRATCH
is Similarly the pathway to the user’s “scratch” directory. More info on
what those directories are for later, but for now, we can print them to
the terminal using the echo command.
~$ echo $HOMEOUTPUT
/users/<username>~$ echo $SCRATCHOUTPUT
/scratch/<username>In addition, the shell can do basic arithmetical operations, execute this command:
~$ echo $((23+45*2))OUTPUT
113Notice that, as customary in mathematics, products take precedence over addition. That is called the PEMDAS order of operations, ie "Parentheses, Exponents, Multiplication and Division, and Addition and Subtraction". Check your understanding of the PEMDAS rule with this command:
~$ echo $(((1+2**3*(4+5)-7)/2+9))OUTPUT
42Notice that the exponential operation is expressed with the
** operator. The usage of echo is important.
Otherwise, if you execute the command without echo, the
shell will do the operation and will try to execute a command called
42 that does not exist on the system. Try by yourself:
~$ $(((1+2**3*(4+5)-7)/2+9))OUTPUT
-bash: 42: command not foundAs you have seen before, when you execute a command on the terminal, in most cases you see the output printed on the screen. The next thing to learn is how to redirect the output of a command into a file. It will be very important to submit jobs later and control where and how the output is produced. Execute the following command:
~$ echo "I am learning UNIX Commands." > report.logWith the character > redirects the output from
echo into a file called report.log. No output is
printed on the screen. If the file does not exist, it will be created.
If the file existed previously, it was erased, and only the new contents
were stored. In fact, > can be used to redirect the
output of any command to a file!
To check that the file actually contains the line produced by
echo, execute:
~$ cat report.logOUTPUT
I am learning UNIX Commands.The cat (concatenate) command displays the contents of one or several files. In the case of multiple files, the files are printed in the order they are described in the command line, concatenating the output as per the name of the command.
In fact, there are hundreds of commands, most of them with a variety of options that change the behavior of the original command. You can feel bewildered at first by a large number of existing commands, but most of the time, you will be using a very small number of them. Learning those will speed up your learning curve.
pwd, cd, and mkdir: Folder
commands
As mentioned, UNIX organizes data in storage devices as a tree. The
commands pwd, cd and mkdir will
allow you to know where you are, move your location on the tree, and
create new folders. Later, we will learn how to move folders from one
location on the tree to another.
The first command is pwd. Just execute the command on
the terminal:
~$ pwdOUTPUT
/users/<username>It is always very important to know where in the tree you are. Doing research usually involves dealing with a large amount of data, and exploring several parameters or physical conditions. Therefore, organizing the filesystem is key.
When you log into a cluster, by default, you are located on your
$HOME folder. That is why the pwd command
should return that location in the first instance.
The following command cd is used to change the
directory. A directory is another name for folder and is
widely used; in UNIX, the terms are interchangeable. Other Desktop
Operating Systems like Windows and MacOS have the concept of smart
folders or virtual folders, where the folder that
you see on screen has no correlation with a directory in the filesystem.
In those cases, the distinction is relevant.
There is another important folder defined in our clusters, it’s
called the scratch folder, and each user has its own. The location of
the folder is stored in the variable $SCRATCH. Notice that
this is internal convection and is not observed in other HPC
clusters.
Use the next command to go to that folder:
~$ cd $SCRATCH
~$ pwd
OUTPUT
/scratch/<username>Notice that the location is different now; if you are using this account for the first time, you will not have files on this folder. It is time to learn another command to list the contents of a folder, execute:
~$ lsAssuming that you are using your HPC account for the first time, you
will not have anything in your $SCRATCH folder and should
therefore see no output from ls. This is a good opportunity
to start your filesystem by creating one folder and moving into it,
execute:
~$ mkdir test_folder
~$ cd test_folder
mkdir allows you to create folders in places where you
are authorized to do so, such as your $HOME and
$SCRATCH folders. Try this command:
~$ mkdir /test_folderOUTPUT
mkdir: cannot create directory `/test_folder': Permission deniedThere is an important difference between test_folder and
/test_folder. The former is a location in your current
directory, and the latter is a location starting on the root directory
/. A normal user has no rights to create folders on that
directory so mkdir will fail, and an error message will be
shown on your screen.
Notice that we named it test_folder instead of
test folder. In UNIX, there is no restriction regarding
files or directories with spaces, but using them can become a nuisance
on the command line. If you want to create the folder with spaces from
the command line, here are the options:
~$ mkdir "test folder with spaces"
~$ mkdir another\ test\ folder\ with\ spaces
In any case, you have to type extra characters to prevent the command line application from considering those spaces as separators for several arguments in your command. Try executing the following:
~$ mkdir another folder with spaces
~$ ls
another folder with spaces folder spaces test_folder test folder with spaces withMaybe is not clear what is happening here. There is an option for
ls that present the contents of a directory:
~$ ls -lOUTPUT
total 0
drwxr-xr-x 2 myname mygroup 512 Nov  2 15:44 another
drwxr-xr-x 2 myname mygroup 512 Nov  2 15:45 another folder with spaces
drwxr-xr-x 2 myname mygroup 512 Nov  2 15:44 folder
drwxr-xr-x 2 myname mygroup 512 Nov  2 15:44 spaces
drwxr-xr-x 2 myname mygroup 512 Nov  2 15:45 test_folder
drwxr-xr-x 2 myname mygroup 512 Nov  2 15:45 test folder with spaces
drwxr-xr-x 2 myname mygroup 512 Nov  2 15:44 with
It should be clear, now what happens when the spaces are not
contained in quotes "test folder with spaces" or escaped as
another\ folder\ with\ spaces. This is the perfect
opportunity to learn how to delete empty folders. Execute:
~$ rmdir another
~$ rmdir folder spaces with
You can delete one or several folders, but all those folders must be empty. If those folders contain files or more folders, the command will fail and an error message will be displayed.
After deleting those folders created by mistake, let's check the
contents of the current directory. The command ls -1 will
list the contents of a file one per line, something very convenient for
future scripting:
~$ ls -1OUTPUT
total 0
drwxr-xr-x 2 myname mygroup 512 Nov  2 15:45 another folder with spaces
drwxr-xr-x 2 myname mygroup 512 Nov  2 15:45 test_folder
drwxr-xr-x 2 myname mygroup 512 Nov  2 15:45 test folder with spaces
cp and mv: Commands for copy and move
files and folders
The next two commands are cp and mv. They
are used to copy or move files or folders from one location to another.
In its simplest usage, those two commands take two arguments: the first
argument is the source and the last one is the destination. In the case
of more than two arguments, the destination must be a directory. The
effect will be to copy or move all the source items into the folder
indicated as the destination.
Before doing a few examples with cp and mv,
let's use a very handy command to create files. The command
touch is used to update the access and modification times
of a file or folder to the current time. If there is no such file, the
command will create a new empty file. We will use that feature to create
some empty files for the purpose of demonstrating how to use
cp and mv.
Let’s create a few files and directories:
~$ mkdir even odd
~$ touch f01 f02 f03 f05 f07 f11
Now, lets copy some of those existing files to complete all the
numbers up to f11:
~$ cp f03 f04
~$ cp f05 f06
~$ cp f07 f08
~$ cp f07 f09
~$ cp f07 f10
This is a good opportunity to present the *
wildcard, and use it to replace an arbitrary sequence of
characters. For instance, execute this command to list all the files
created above:
~$ ls f*OUTPUT
f01 f02 f03 f04 f05 f06 f07 f08 f09 f10 f11The wildcard is able to replace zero or more arbitrary characters, for example:
~$ ls f*1OUTPUT
f01 f11There is another way of representing files or directories that follow a pattern, execute this command:
~$ ls f0[3,5,7]OUTPUT
f03 f05 f07The files selected are those whose last character is on the list
[3,5,7]. Similarly, a range of characters can be
represented. See:
~$ ls f0[3-7]OUTPUT
f03 f04 f05 f06 f07We will use those special characters to move files based on their parity. Execute:
~$ mv f[0,1][1,3,5,7,9] odd
~$ mv f[0,1][0,2,4,6,8] even
The command above is equivalent to executing the explicit listing of sources:
~$ mv f01 f03 f05 f07 f09 f11 odd
~$ mv f02 f04 f06 f08 f10 even
rm and rmdir: Delete files and
Folders
As we mentioned above, empty folders can be deleted with the command
rmdir, but that only works if there are no subfolders or
files inside the folder that you want to delete. See for example, what
happens if you try to delete the folder called odd:
~$ rmdir oddOUTPUT
rmdir: failed to remove `odd': Directory not emptyIf you want to delete odd, you can do it in two ways. The command
rm allows you to delete one or more files entered as
arguments. Let's delete all the files inside odd, followed by the
deletion of the folder odd itself:
~$ rm odd/*
~$ rmdir odd
Another option is to delete a folder recursively, this is a powerful but also dangerous option. Quite unlike Windows/MacOS, recovering deleted files through a “Trash Can” or “Recycling Bin” does not happen in Linux; deleting is permanent. Let's delete the folder even recursively:
~$ rm -r evenSummary of Basic Commands
The purpose of this brief tutorial is to familiarize you with the most common commands used in UNIX environments. We have shown ten commands that you will be using very often in your interaction. These 10 basic commands and one editor from the next section are all that you need to be ready to submit jobs on the cluster.
The next table summarizes those commands.
| Command | Description | Examples |
|---|---|---|
echo |
🔴 Display a given message on the screen | $ echo "This is a message" |
cat |
🔴
Display the contents of a file on screen Concatenate files |
$ cat my_file |
date |
🔴 Shows the current date on screen |
$ date Sun Jul 26 15:41:03 EDT 2020 |
pwd |
🟢 Return the path to the current working directory |
$ pwd /users/username |
cd |
🟢 Change directory | $ cd sub_folder |
mkdir |
🟢 Create directory | $ mkdir new_folder |
touch |
:blue_circle: Change the access and modification time
of a file Create empty files |
$ touch new_file |
cp |
🟣 Copy a file in another location
Copy several files into a destination directory |
$ cp old_file new_file |
mv |
🟣 Move a file in another location
Move several files into a destination folder |
$ mv old_name new_name |
rm |
🟣 Remove one or more files from the file system tree |
$ rm trash_file $ rm -r full_folder
|
Exercise 1
Get into Thorny Flat with your training account and execute the
commands ls, date, and cal.
Exit from the cluster with exit.
So let’s try our first command, which will list the contents of the current directory:
[training001@srih0001 ~]$ ls -alOUTPUT
total 64
drwx------   4 training001 training   512 Jun 27 13:24 .
drwxr-xr-x 151 root        root     32768 Jun 27 13:18 ..
-rw-r--r--   1 training001 training    18 Feb 15  2017 .bash_logout
-rw-r--r--   1 training001 training   176 Feb 15  2017 .bash_profile
-rw-r--r--   1 training001 training   124 Feb 15  2017 .bashrc
-rw-r--r--   1 training001 training   171 Jan 22  2018 .kshrc
drwxr-xr-x   4 training001 training   512 Apr 15  2014 .mozilla
drwx------ 2 training001 training 512 Jun 27 13:24 .sshCommand not found
If the shell can’t find a program whose name is the command you typed, it will print an error message such as:
~$ ksOUTPUT
ks: command not foundUsually this means that you have mis-typed the command.
Exercise 2
Commands in Unix/Linux are very stable with some existing for decades now. This exercise begins to give you a feeling of the different parts of a command.
Execute the command cal, we executed the command before
but this time execute it again like this cal -y. What you
will get as result?
Another very simple command that is very useful in HPC is
date. What is the result of executing this command? Search
for the manual for alternative formats for the date
The output of the first command:
OUTPUT
% cal -y
                            2025
      January               February               March
Su Mo Tu We Th Fr Sa  Su Mo Tu We Th Fr Sa  Su Mo Tu We Th Fr Sa
          1  2  3  4                     1                     1
 5  6  7  8  9 10 11   2  3  4  5  6  7  8   2  3  4  5  6  7  8
12 13 14 15 16 17 18   9 10 11 12 13 14 15   9 10 11 12 13 14 15
19 20 21 22 23 24 25  16 17 18 19 20 21 22  16 17 18 19 20 21 22
26 27 28 29 30 31     23 24 25 26 27 28     23 24 25 26 27 28 29
                                            30 31

       April                  May                   June
Su Mo Tu We Th Fr Sa  Su Mo Tu We Th Fr Sa  Su Mo Tu We Th Fr Sa
       1  2  3  4  5               1  2  3   1  2  3  4  5  6  7
 6  7  8  9 10 11 12   4  5  6  7  8  9 10   8  9 10 11 12 13 14
13 14 15 16 17 18 19  11 12 13 14 15 16 17  15 16 17 18 19 20 21
20 21 22 23 24 25 26  18 19 20 21 22 23 24  22 23 24 25 26 27 28
27 28 29 30           25 26 27 28 29 30 31  29 30


        July                 August              September
Su Mo Tu We Th Fr Sa  Su Mo Tu We Th Fr Sa  Su Mo Tu We Th Fr Sa
       1  2  3  4  5                  1  2      1  2  3  4  5  6
 6  7  8  9 10 11 12   3  4  5  6  7  8  9   7  8  9 10 11 12 13
13 14 15 16 17 18 19  10 11 12 13 14 15 16  14 15 16 17 18 19 20
20 21 22 23 24 25 26  17 18 19 20 21 22 23  21 22 23 24 25 26 27
27 28 29 30 31        24 25 26 27 28 29 30  28 29 30
                      31

      October               November              December
Su Mo Tu We Th Fr Sa  Su Mo Tu We Th Fr Sa  Su Mo Tu We Th Fr Sa
          1  2  3  4                     1      1  2  3  4  5  6
 5  6  7  8  9 10 11   2  3  4  5  6  7  8   7  8  9 10 11 12 13
12 13 14 15 16 17 18   9 10 11 12 13 14 15  14 15 16 17 18 19 20
19 20 21 22 23 24 25  16 17 18 19 20 21 22  21 22 23 24 25 26 27
26 27 28 29 30 31     23 24 25 26 27 28 29  28 29 30 31
                      30
The output of the date comand:
~$ dateOUTPUT
Wed Aug 20 12:50:00 EDT 2025For alternative formats for the date execute:
~$ man dateExercise 3
Create two folders called one and two. In
one create the empty file none1 and in
two create > the empty file none2.
Create also in those two folders, files date1 and >
date2 by redirecting the output from the command
date > using >.
~$ date > date1Check with cat that those files contain dates.
Now, create the folders empty_files and
dates and move > the corresponding files
none1 and none2 to >
empty_files and do the same for date1 and
date2.
The folders one and two should be empty
now; delete > them with rmdir to achieve the same with
folders empty_files and dates with
rm -r.
Exercise 4
The command line is powerful enough even to do programming. Execute the command below and see the answer.
[training001@srih0001 ~]$ n=1; while test $n -lt 10000; do echo $n; n=`expr 2 \* $n`; doneOUTPUT
> 1
> 2
> 4
> 8
> 16
> 32
> 64
> 128
> 256
> 512
> 1024
> 2048
> 4096
> 8192
If you are not getting this output check the command line very carefully. Even small changes could be interpreted by the shell as entirely different commands so you need to be extra careful and gather insight when commands are not doing what you want.
Now the challenge consists on tweaking the command line above to show the calendar for August for the next 10 years.
Hint
Use the command
cal -hto get a summary of the arguments to show just one month for one specific year You can useexprto increasenby one on each cycle, but you can also usen=$(n+1)
Grabbing files from the internet
To download files from the internet, the absolute best tool is
wget. The syntax is relatively straightforwards:
wget https://some/link/to/a/file.tar.gz
Downloading the Drosophila genome
The Drosophila melanogaster reference genome is located at
the following website: https://metazoa.ensembl.org/Drosophila_melanogaster/Info/Index.
Download it to the cluster with wget.
-
cdto your genome directory - Copy this URL and paste it onto the command line:
~$ wget ftp://ftp.ensemblgenomes.org:21/pub/metazoa/release-51/fasta/drosophila_melanogaster/dna/Drosophila_melanogaster.BDGP6.32.dna_rm.toplevel.fa.gzWorking with compressed files, using unzip and gunzip
The file we just downloaded is gzipped (has the .gz
extension). You can uncompress it with
gunzip filename.gz.
File decompression reference:
-
.tar.gz -
tar -xzvf archive-name.tar.gz -
.tar.bz2 -
tar -xjvf archive-name.tar.bz2 -
.zip -
unzip archive-name.zip -
.rar -
unrar archive-name.rar -
.7z -
7z x archive-name.7z
However, sometimes we will want to compress files ourselves to make file transfers easier. The larger the file, the longer it will take to transfer. Moreover, we can compress a whole bunch of little files into one big file to make it easier on us (no one likes transferring 70000) little files!
The two compression commands we’ll probably want to remember are the following:
- Compress a single file with Gzip -
gzip filename - Compress a lot of files/folders with Gzip -
tar -czvf archive-name.tar.gz folder1 file2 folder3 etc
Wildcards, shortcuts, and other time-saving tricks
Wild cards
The “*” wildcard:
Navigate to the
~/workshops_hands-on/Introduction_HPC/2._Command_Line_Interface/ABINIT
directory.
The “*” character is a shortcut for “everything”. Thus, if you enter
ls *, you will see all of the contents of a given
directory. Now try this command:
This lists every file that starts with a 2. Try this
command:
This lists every file in /usr/bin directory that ends in
the characters .sh. “*” can be placed anywhere in your
pattern. For example:
This lists only the files that begin with ‘t17’ and end with
.nc.
So, how does this actually work? The Shell (bash) considers an asterisk “*” to be a wildcard character that can match one or more occurrences of any character, including no character.
Tip - An asterisk/star is only one of the many wildcards in Unix, but this is the most powerful one, and we will be using this one the most for our exercises.
The “?” wildcard:
Another wildcard that is sometimes helpful is ?.
? is similar to * except that it is a
placeholder for exactly one position. Recall that * can
represent any number of following positions, including no positions. To
highlight this distinction, lets look at a few examples. First, try this
command:
This will display all files in /bin/ that start with “d”
regardless of length. However, if you only wanted the things in
/bin/ that starts with “d” and are two characters long,
then you can use:
Lastly, you can chain together multiple “?” marks to help specify a
length. In the example below, you would be looking for all things in
/bin/ that start with a “d” and have a name length of three
characters.
Exercise
Do each of the following using a single ls command
without navigating to a different directory.
- List all of the files in
/binthat start with the letter ‘c’ - List all of the files in
/binthat contain the letter ‘a’ - List all of the files in
/binthat end with the letter ‘o’
BONUS: Using one command to list all of the files in
/bin that contain either ‘a’ or ‘c’. (Hint: you might need
to use a different wildcard here. Refer to this post
for some ideas.)
Shortcuts
There are some very useful shortcuts that you should also know about.
Home directory or “~”
Dealing with the home directory is very common. In the shell, the
tilde character “~”, is a shortcut for your home directory. Let’s first
navigate to the ABINIT directory (try to use tab completion
here!):
Then enter the command:
This prints the contents of your home directory without you having to type the full path. This is because the tilde “~” is equivalent to “/home/username”, as we had mentioned in the previous lesson.
Parent directory or “..”
Another shortcut you encountered in the previous lesson is “..”:
The shortcut .. always refers to the parent directory of
whatever directory you are currently in. So, ls .. will
print the contents of unix_lesson. You can also chain these
.. together, separated by /:
This prints the contents of /n/homexx/username, which is
two levels above your current directory (your home directory).
Current directory or “.”
Finally, the special directory . always refers to your
current directory. So, ls and ls . will do the
same thing - they print the contents of the current directory. This may
seem like a useless shortcut, but recall that we used it earlier when we
copied over the data to our home directory.
To summarize, the commands ls ~ and ls ~/.
do exactly the same thing. These shortcuts can be convenient when you
navigate through directories!
Command History
You can easily access previous commands by hitting the arrow key on your keyboard. This way, you can step backward through your command history. On the other hand, the arrow key takes you forward in the command history.
Try it out! While on the command prompt, hit the arrow a few times, and then hit the arrow a few times until you are back to where you started.
You can also review your recent commands with the
history command. Just enter:
You should see a numbered list of commands, including the
history command you just ran!
Only a certain number of commands can be stored and displayed with
the history command by default, but you can increase or
decrease it to a different number. It is outside the scope of this
workshop, but feel free to look it up after class.
NOTE: So far, we have only run very short commands that have very few or no arguments. It would be faster to just retype it than to check the history. However, as you start to run analyses on the command line, you will find that the commands are longer and more complex, and the
historycommand will be very useful!
Cancel a command or task
Sometimes as you enter a command, you realize that you don’t want to continue or run the current line. Instead of deleting everything you have entered (which could be very long), you could quickly cancel the current line and start a fresh prompt with Ctrl + C.
Another useful case for Ctrl + C is when a task
is running that you would like to stop. In order to illustrate this, we
will briefly introduce the sleep command.
sleep N pauses your command line from additional entries
for N seconds. If we would like to have the command line not accept
entries for 20 seconds, we could use:
While your sleep command is running, you may decide that
in fact, you do want to have your command line back. To terminate the
rest of the sleep command simply type:
Ctrl + C
This should terminate the rest of the sleep command.
While this use may seem a bit silly, you will likely encounter many
scenarios when you accidentally start running a task that you didn’t
mean to start, and Ctrl + C can be immensely
helpful in stopping it.
Other handy command-related shortcuts
- Ctrl + A will bring you to the start of the command you are writing.
- Ctrl + E will bring you to the end of the command.
Exercise
- Checking the
historycommand output, how many commands have you typed in so far? - Use the arrow key to check the command you typed
before the
historycommand. What is it? Does it make sense? - Type several random characters on the command prompt. Can you bring the cursor to the start with + ? Next, can you bring the cursor to the end with + ? Finally, what happens when you use + ?
Summary: Commands, options, and keystrokes covered
~           # home dir
.           # current dir
..          # parent dir
*           # wildcard
ctrl + c    # cancel current command
ctrl + a    # start of line
ctrl + e    # end of line
history
Advanced Bash Commands and Utilities
As you begin working more with the Shell, you will discover that there are mountains of different utilities at your fingertips to help increase command-line productivity. So far, we have introduced you to some of the basics to help you get started. In this lesson, we will touch on more advanced topics that can be very useful as you conduct analyses in a cluster environment.
Configuring your shell
In your home directory, there are two hidden files,
.bashrc and .bash_profile. These files contain
all the startup configuration and preferences for your command line
interface and are loaded before your Terminal loads the shell
environment. Modifying these files allows you to change your preferences
for features like your command prompt, the colors of text, and add
aliases for commands you use all the time.
NOTE: These files begin with a dot (
.) which makes it a hidden file. To view all hidden files in your home directory, you can use:
$ ls -al ~/
.bashrc versus .bash_profile
You can put configurations in either file, and you can create either if it doesn’t exist. But why two different files? What is the difference?
The difference is that .bash_profile is executed
for login shells, while .bashrc is executed for interactive
non-login shells. It is helpful to have these separate files
when there are preferences you only want to see on the login and not
every time you open a new terminal window. For example, suppose you
would like to print some lengthy diagnostic information about your
machine (load average, memory usage, current users, etc) - the
.bash_profile would be a good place since you would only
want in displayed once when starting out.
Most of the time you don’t want to maintain two separate
configuration files for login and non-login shells. For example, when
you export a $PATH (as we had done previously), you want it
to apply to both. You can do this by sourcing .bashrc from
within your .bash_profile file. Take a look at your
.bash_profile file, it has already been done for you:
You should see the following lines:
What this means is that if a .bashrc files exist, all
configuration settings will be sourced upon logging in. Any settings you
would like applied to all shell windows (login and interactive) can
simply be added directly to the .bashrc file rather than in
two separate files.
Changing the prompt
In your file .bash_profile, you can change your prompt
by adding this:
BASH
PS1="\[\033[35m\]\t\[\033[m\]-\[\033[36m\]\u\[\033[m\]@$HOST_COLOR\h:\[\033[33;1m\]\w\[\033[m\]\$ "
export PS1
You have yet to learn how to edit text files. Keep in mind that when you know how to edit files, you can test this trick. After editing the file, you need to source it or restart your terminal.
Aliases
An alias is a short name that the shell translates into another
(usually longer) name or command. They are typically placed in the
.bash_profile or .bashrc startup files so that
they are available to all subshells. You can use the alias
built-in command without any arguments, and the shell will
display a list of all defined aliases:
This should return to you the list of aliases that have been set for you, and you can see the syntax used for setting an alias is:
When setting an alias no spaces are permitted around the
equal sign. If value contains spaces or tabs, you must enclose
the value within quotation marks. ll is a common alias that
people use, and it is a good example of this:
Since we have a modifier -l and there is a space
required, the quotations are necessary.
Let’s setup our own alias! Every time we want to
start an interactive session we have type out this lengthy command.
Wouldn’t it be great if we could type in a short name instead? Open up
the .bashrc file using vim:
Scroll down to the heading
“# User specific aliases and functions,” and on the next
line, you can set your alias:
Symbolic links
A symbolic link is a kind of “file” that is essentially a pointer to another file name. Symbolic links can be made to directories or across file systems with no restrictions. You can also make a symbolic link to a name that is not the name of any file. (Opening this link will fail until a file by that name is created.) Likewise, if the symbolic link points to an existing file which is later deleted, the symbolic link continues to point to the same file name even though the name no longer names any file.
The basic syntax for creating a symlink is:
There is a scratch folder under the variable $SCRATCH. You can create a symbolic link to that location from your $HOME
And then we can symlink the files:
Now, if you check the directory where we created the symlinks, you should see the filenames listed in cyan text followed by an arrow pointing to the actual file location. (NOTE: If your files are flashing red text, this is an indication your links are broken so you might want to double check the paths.)
Transferring files with rsync
When transferring large files or a large number of files,
rsync is a better command to use.
rsync employs a special delta transfer algorithm and a few
optimizations to make the operation a lot faster. It will check
file sizes and modification timestamps of both file(s) to be
copied and the destination and skip any further processing if they
match. If the destination file(s) already exists, the delta transfer
algorithm will make sure only differences between the two are
sent over.
There are many modifiers for the rsync command, but in
the examples below, we only introduce a select few that we commonly use
during file transfers.
Example 1:
rsync -t --progress /path/to/transfer/files/*.c /path/to/destinationThis command would transfer all files matching the pattern *.c from the transfer directory to the destination directory. If any of the files already exist at the destination, then the rsync remote-update protocol is used to update the file by sending only the differences.
Example 2:
rsync -avr --progress /path/to/transfer/directory /path/to/destinationThis command would recursively transfer all files from the transfer
directory into the destination directory. The files are transferred in
“archive” mode (-a), which ensures that symbolic links,
devices, attributes, permissions, ownerships, etc., are preserved in the
transfer. In both commands, we have additional modifiers for verbosity
so we have an idea of how the transfer is progressing (-v,
--progress)
NOTE: A trailing slash on the transfer directory changes the behavior to avoid creating an additional directory level at the destination. You can think of a trailing
/as meaning “copy the contents of this directory” as opposed to “copy the directory by name”.
This lesson has been adapted from several sources, including the materials from the Harvard Chan Bioinformatics Core (HBC). These are open-access materials distributed under the terms of the Creative Commons Attribution license (CC BY 4.0), which permits unrestricted use, distribution, and reproduction in any medium, provided the original author and source are credited.
- The materials used in this lesson were also derived from work that is Copyright © Data Carpentry (https://datacarpentry.org/). All Data Carpentry instructional material is made available under the Creative Commons Attribution license (CC BY 4.0).
- Adapted from the lesson by Tracy Teal. Original contributors: Paul Wilson, Milad Fatenejad, Sasha Wood, and Radhika Khetani for Software Carpentry (https://software-carpentry.org/)
- Get sufficient familiarity with basic comands such as
ls,cp,cd,pwdandrm - If you want to know extra arguments for command that you know use
the command
man - Most Linux/UNIX commands are just programs that have existed for decades and whose use has been for most part standarized overtime. The commands that you learn will serve you in the future so it is a fruitful investment.